This integration connects the Business Pilot system with the Blink Payment platform to help make managing your payments easier.
In order to set-up this integration, you will need to be a Blink Payment customer – you can fill in this quick form to request a callback from one of their payment experts.
Before we get you set-up with the Blink Payment integration, here’s some need-to-know information.
Blink Payment
Blink Payment – payment technology, powered by people.
Blink Payment is a platform that makes accepting payments easy. Their easy-to-use platform provides a secure and seamless way to manage all of your payment processing.
Blink Payment offers a number of payment processing options, including credit and debit card payments and Open Banking.
The experts at Blink Payment can talk you through all of the options available to you and discuss the exclusive rates they can offer you as a Business Pilot user.
Please note that to enable Open banking, there is a short application process with Blink Payment’s provider – talk to Blink Payment for more details.
Blink Payment Links
Payment Links (also known as Paylinks) help you process payments more easily. Our integration has been built around Payment Links. Within Business Pilot, you can generate a Blink Payment Link, which can then be shared with your customers.
Your customers then use this link to make a payment to you by bank transfer, credit or debit card, Google Pay or Apple Pay, depending on the service you have with Blink Payment.
Blink Payment Link types
There are two Blink Payment Link types.
- Invoice Payment Link – these are Payment Links created specifically for paying an invoice. You can see these under the Invoice tab of your Contract page.
- Contract Payment Link – this is used for payment on account (POA). This can be found under the Invoice tab of your Contract page too.
Payments
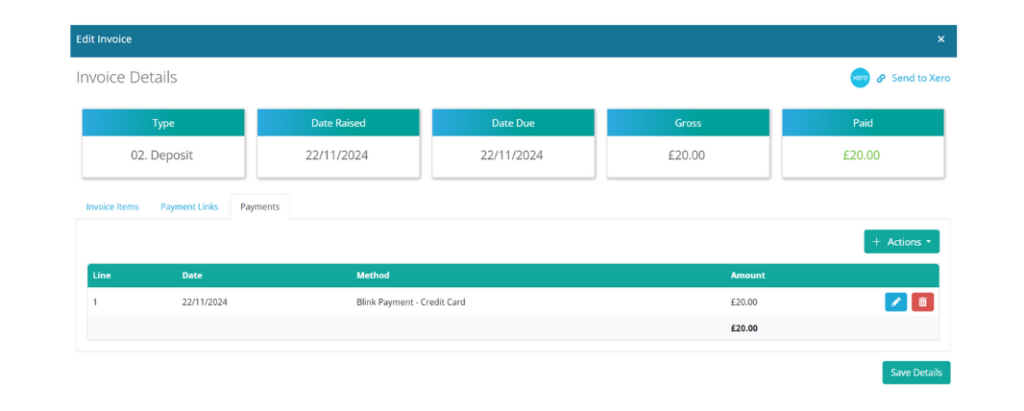
Once a payment has been made via an Invoice Payment Link, it will add the payment to your invoice within Business Pilot.
When a payment is made on a Contract Payment Link, you will see the status will update to ‘paid’ as well as the payment method details, and amount paid.
Connecting Business Pilot to Blink Payment
To integrate Business Pilot with Blink Payment, you will need to find your API Key and Secret Key in the Blink Payment system.
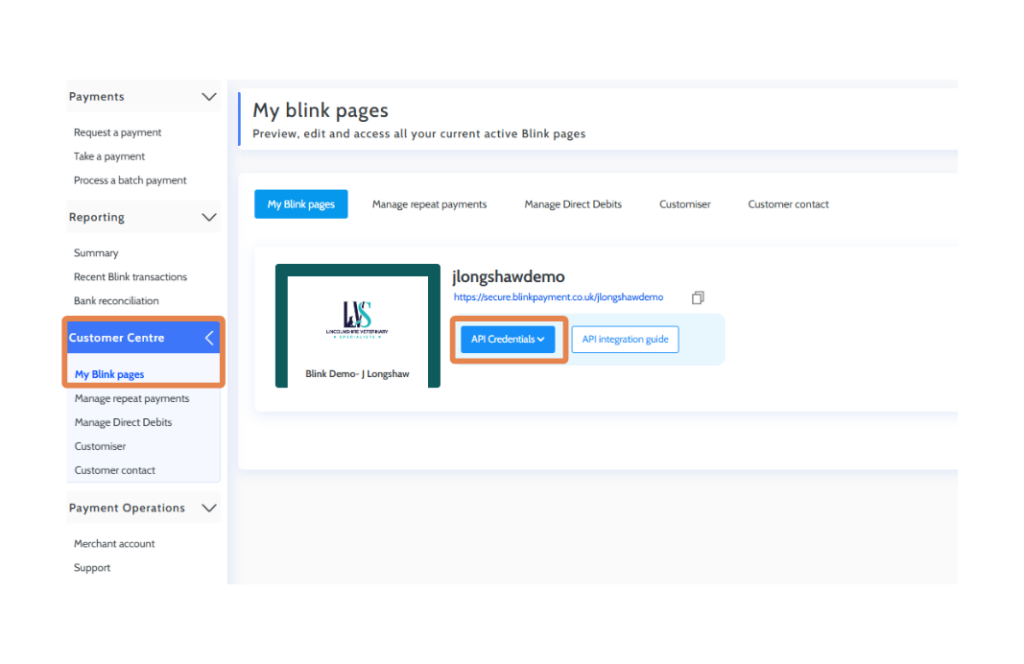
To find these, head to Customer Centre > My Blink Pages
Here, you should see a blue button called ‘Enable your API Credentials’. Click this button and select ‘Yes’ when asked if you’re sure.
Then the button will change to say ‘API Credentials’
Click on this API Credentials drop-down, copy your API Key and Secret Key and keep it safe, ready to paste into the Business Pilot system.
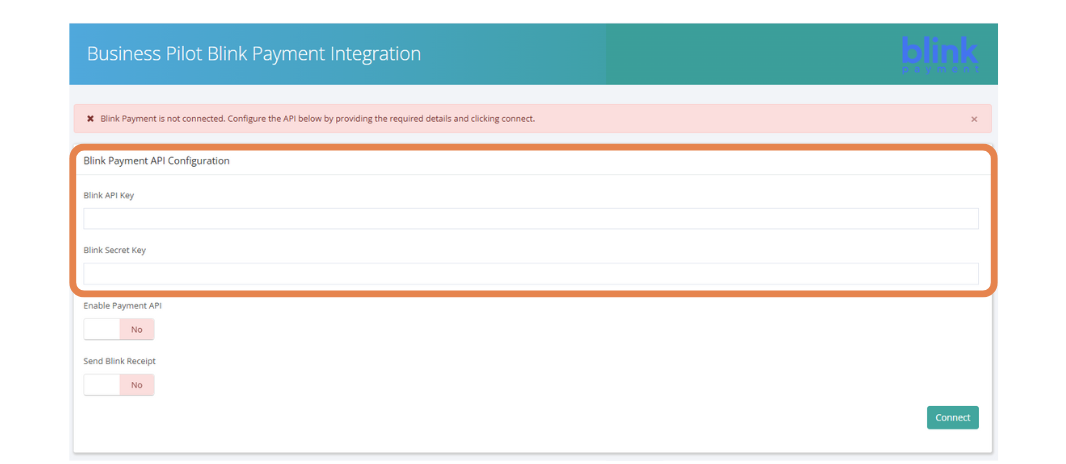
Back in Business Pilot, go to Admin > System Integrations > Blink Pay
Input your Blink API Key and Blink Secret Key and choose your preferences.
Then click ‘Connect’.
Payment Link settings
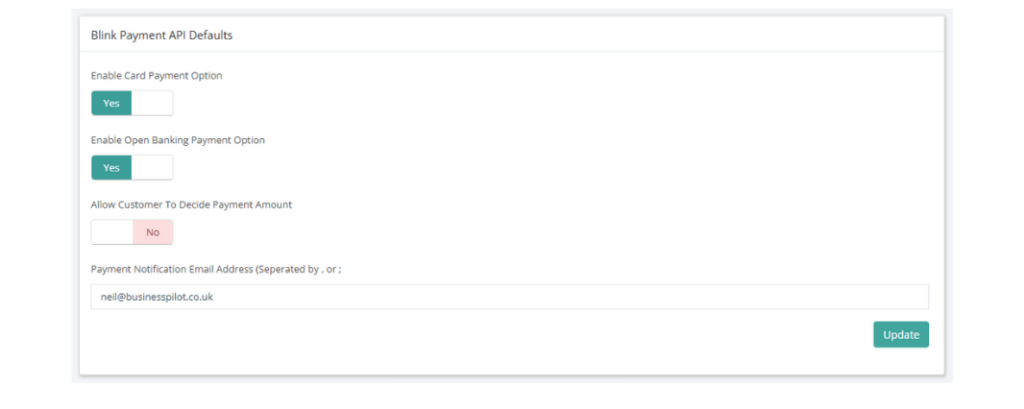
Here’s a quick guide to Blink Payment Link settings:
- Enable payment API = you can create Payment Links
- Send Blink receipt = Blink Payment will send a receipt to your customer on your behalf when they have paid via a Payment Link
- Enable card payment option = if you have this option set-up with your Blink Payment account, you can create Payment Links with the option to pay by card
- Enable open banking = if you have this option set-up with your Blink Payment account, you can create Payment Links with the option to pay by bank transfer
- Allow customer to decide amount = allows your customer to change the amount field on a Payment Link
- Payment notification = any email addresses in this section will receive a notification each time a customer has paid via a Payment Link
How to define Payment Link settings by invoice type
Once you have set-up your default settings in the Admin area and the Blink Payment integration is enabled, you will need to set the relevant invoice types you wish to use with the integration.
To set this up, go to Admin > Finance > Invoice Types.
Here, you will now see a new column called ‘Blink Enabled?’
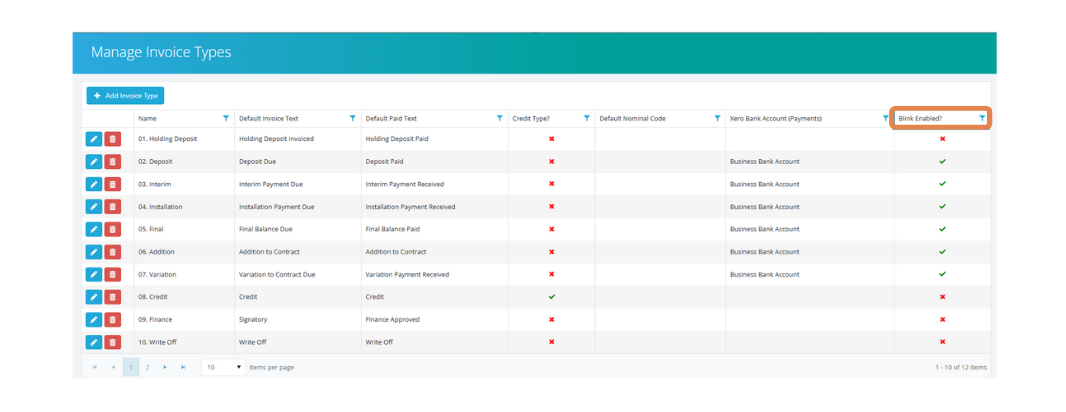
To update an Invoice Type to enable Blink Payment, click on the pencil icon.
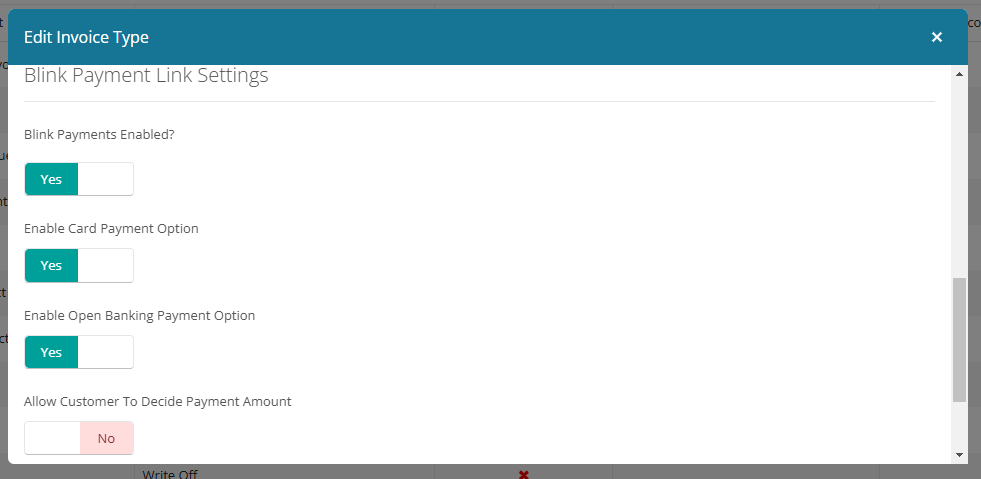
In the new window, scroll down to the Blink Payment Link Settings area and select your settings.
Please note that Blink Payment settings on invoice types will override the default settings you have made in the admin area.
How to create an invoice with a Payment Link
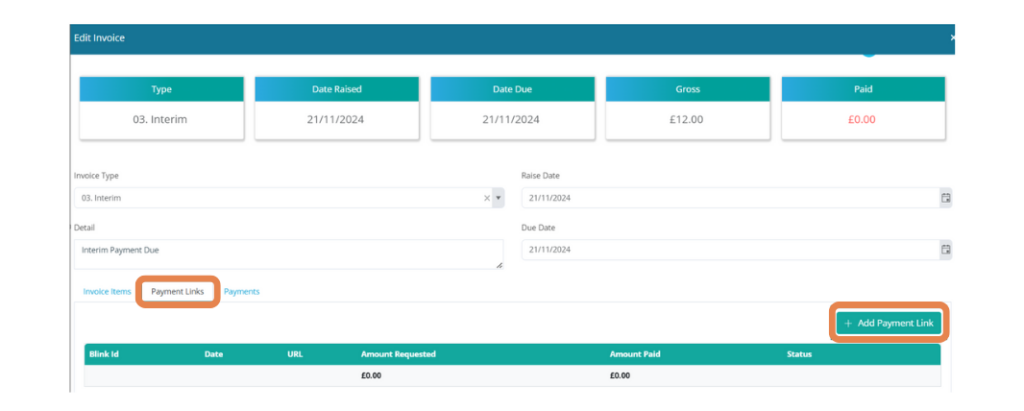
When you create and raise an invoice, you can choose to generate a Payment Link.
- Create an invoice
- When you select the invoice type and raise date, a new option will appear to ‘Generate Blink Payment Link’ – choose ‘Yes’ and complete your invoice information as normal
- If your Xero-linked bank accounts are connected to Business Pilot, choose the appropriate bank account from the drop-down list
- To find your Payment Link, click the pencil icon to edit the invoice, then choose the Payment Links tab
- Click the word ‘Link’ to copy the link to your clipboard to be pasted into your own emails or messages
- You can also add Payment Links to your document and email templates so that they are automatically populated – see more below
How to create a Contract Payment Link (POA)
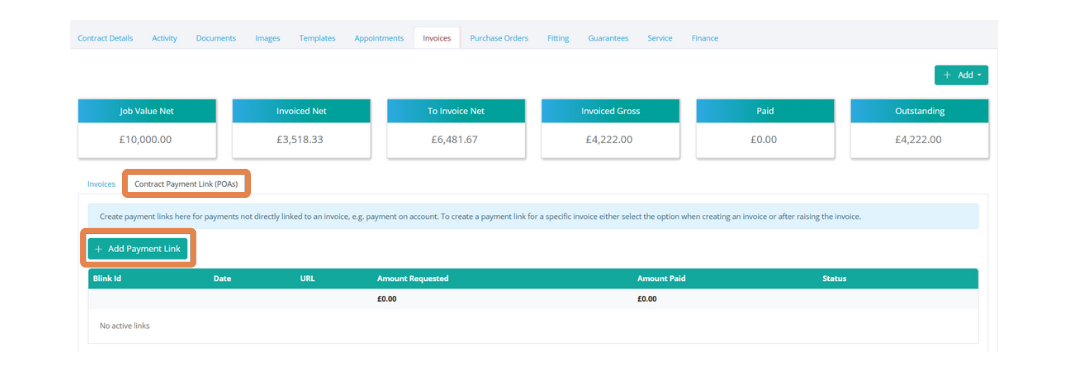
These links are for payments not linked to an invoice, for example a payment on account (POA). To create a Contract Payment Link:
- Head to your Contract and select the Invoice tab
- Choose the Contract Payment Link (POAs) tab
- Click the ‘Add Payment Link’ button
- Check the customer’s name and email address – the email address can be amended here if required.
- Input your amount
- If your Xero-linked bank accounts are connected to Business Pilot, choose the appropriate bank account from the drop-down list
- Click create
- You will then see a new line in the Contract Payment Link (POAs) tab
- Click the word ‘link’ to copy the Payment Link to your clipboard to be pasted into your own emails or messages to customers
- You can also add Payment Links to your document and email templates so that they are automatically populated – see more below
A few things to note:
- System Logs will be generated when a Payment Link is generated, paid or deleted
- Payment Links that have already been paid cannot be edited or deleted.
- It is not possible to delete an invoice once it has been paid via a Payment Link
How to add a Payment Link to Document and BPmail templates
Adding Payment Links to document templates such as invoices and statements and email templates works in the same way as all of our other placeholders. All you need to do is insert the correct placeholder where you would like it in your document or email template.
- The placeholder for Contract (POA) Payment Links is: «ContractPaymentLink»
- The placeholder for Invoice Payment Links is: «InvoicePaymentLink»
To edit your document templates, go to Admin > Documents & Images > Document Templates, then add your new placeholders as required.
Then your Payment Link will be shown as below on your document:
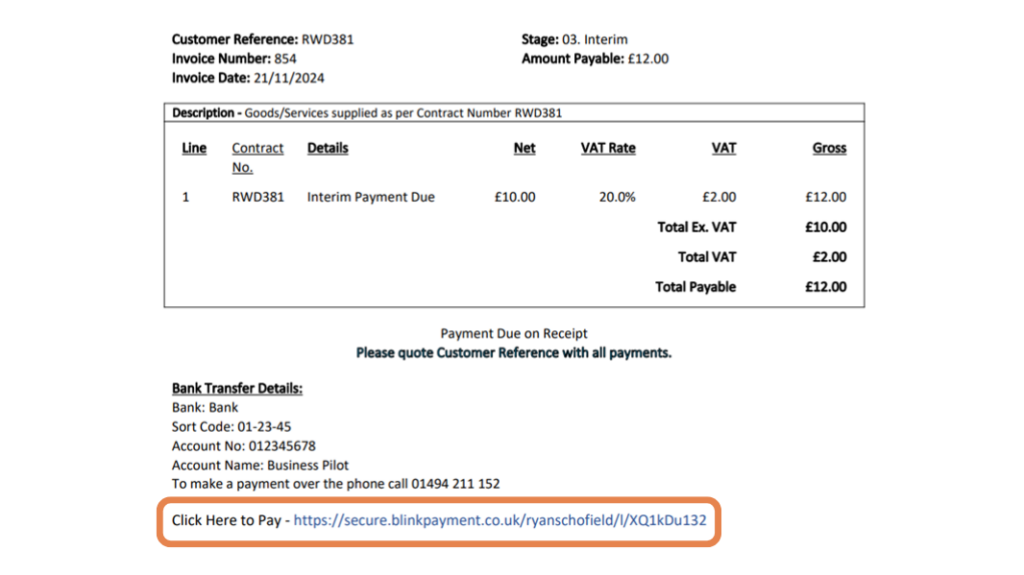
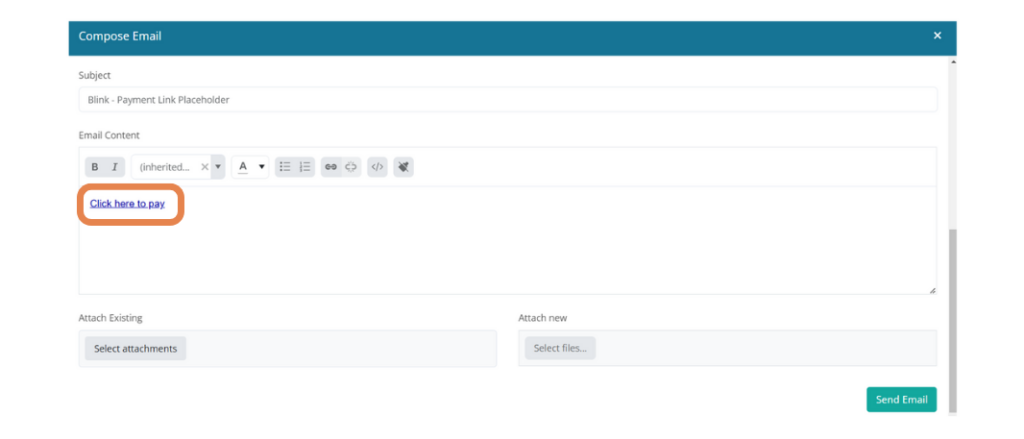
To edit your email templates, go to Admin > Emails > Email templates, then add your new placeholders as required.
Then your Payment Link will be shown as below on your emails:
Customer payments
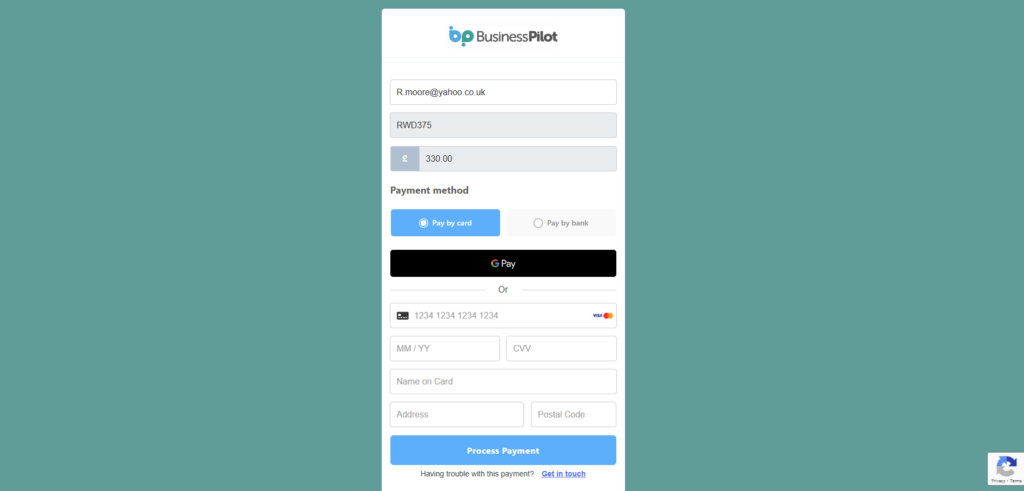
When your customer follows a Payment Link, they will be taken to a page where they can make their payment.
Once an Invoice Payment Link has been processed, the invoice in Business Pilot will be marked as paid.
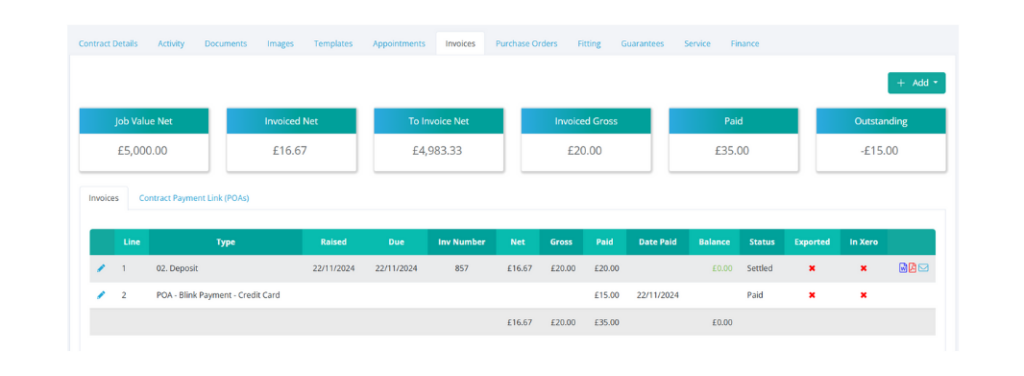
If it is a Contract Payment Link, the status will update to ‘paid’ under the Contract Payment Link (POAs) tab in the Invoice area in the Contract.
Integrating Business Pilot, Blink Payment & Xero
If you are a Xero and Blink Payment customer, you can integrate Business Pilot with both platforms.
The main benefit of this is that when a Payment Link has been paid by your customer and showing on your Business Pilot invoice, it will also push this payment to the Xero invoice automatically.
To use these features, you must have your Xero-linked bank account set-up via your Xero integration settings.
If you have more than one bank account linked to Xero, you can connect both of these and then choose the bank account that the payment should go to whenever you create an Invoice Payment Link or Contract Payment Link.
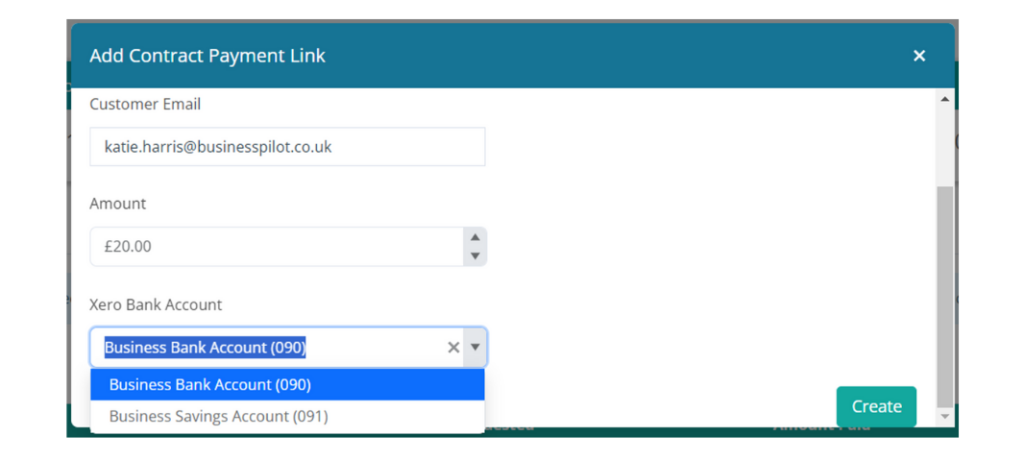
This will mean that the auto reconciliation inside of Xero will match the live bank account transactions to the ones in the Xero account (or highlight the differences).
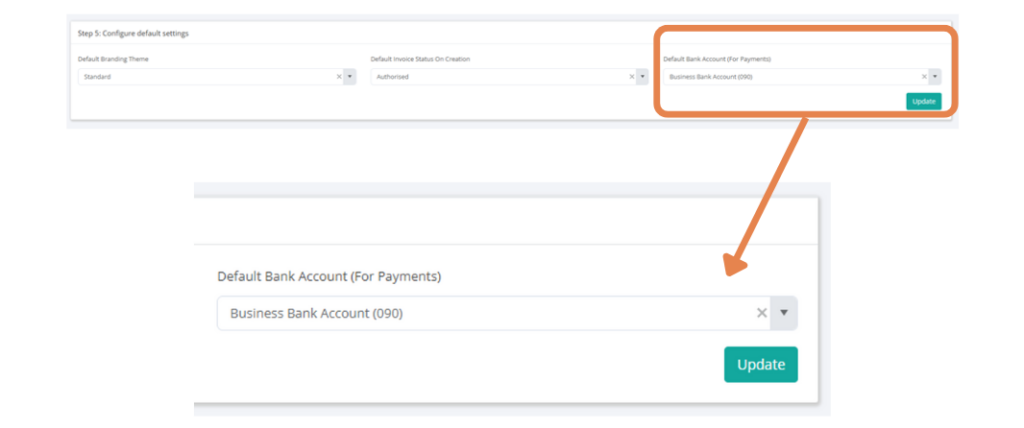
To set-up your Xero-linked bank account with Business Pilot, go to Admin > Integrations > Xero
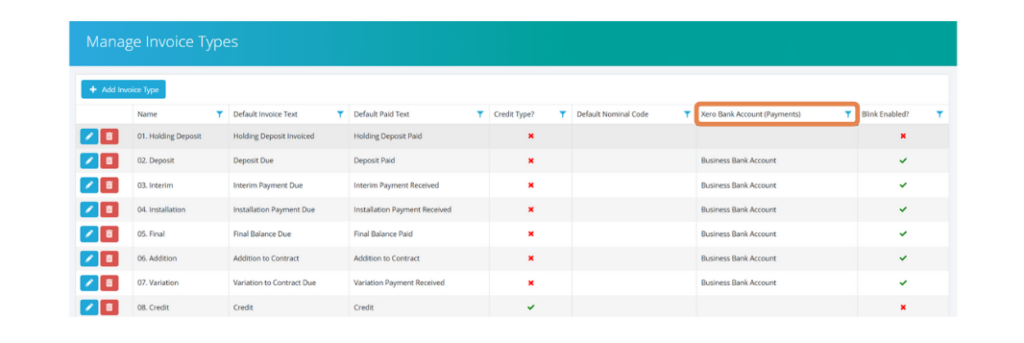
You can also use this feature in the Invoice Type settings area and specify the destination bank account for each invoice type. So for example, you could set a deposit Invoice Type to go directly to the bank account where you collect deposits.
To set this up, head to Admin > Finance > Invoice Types.
Reporting & Exports
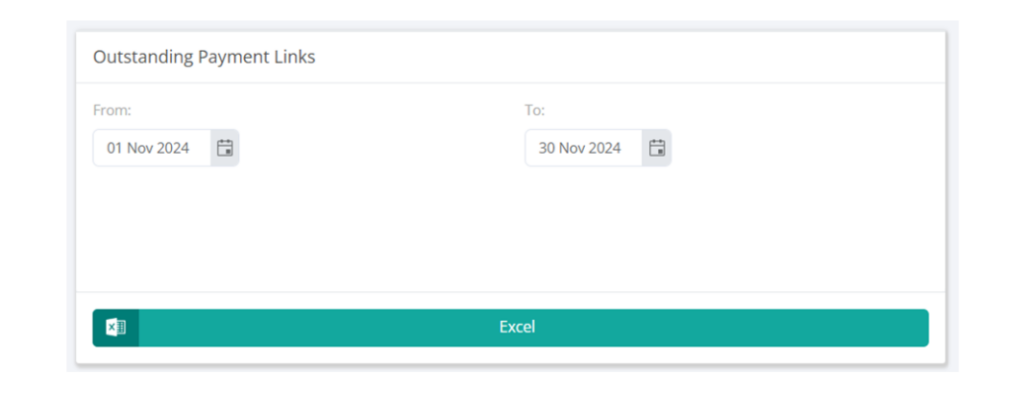
In the Reports area, you can find an ‘Outstanding Payment Links’ report. This works in the same way as our other reports. To run it, select your dates and click the green ‘Excel’ button.
This will download an Excel spreadsheet where you can see all outstanding, unpaid Payment Links.
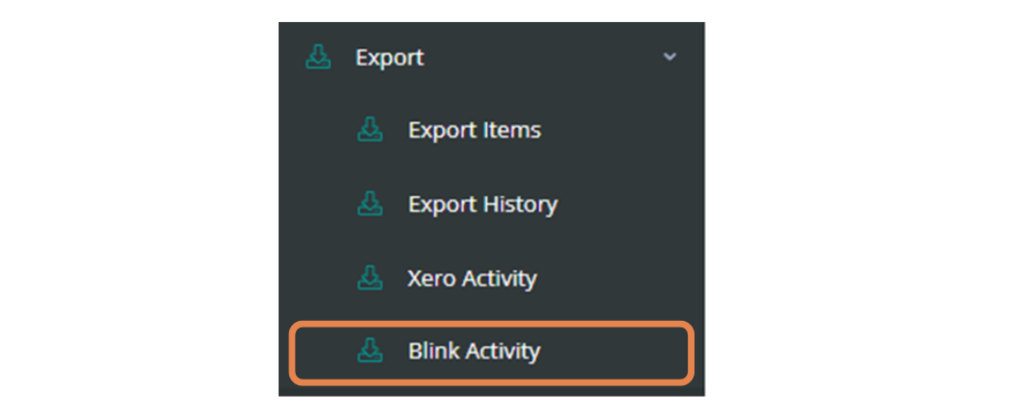
Under the Export dropdown in the main menu, you will also see an option called Blink Activity, where you can export all activity related to the Blink Payment integration.
This is useful if you need to check on any Payment Links or payments because of a variation in your accounts, or during any auditing processes.
