
We have designed exports for Sage to make it easy to integrate Business Pilot with your accounting software. Besides combining the key features of both systems, you can also extend your reporting capabilities. The Exports tab in our Main Menu lets you import Customers, Customer Invoices, Customer Payments, and Job Costs into Sage with our Sage Integration.
By integrating Business Pilot with Sage, you will spend less time on Sage. Invoices and purchase orders will be created on Business Pilot and you will be able to include payments from customers and invoices from suppliers as soon as they are ready.
IMPORTANT: Make a backup of your Sage database before you begin.
If you make a mistake during the import, you can easily undo it by recovering the database from the backup.
Business Pilot Support cannot assist with any issues following the import mapping, as this will be due to a setting in the Sage software, which cannot be accessed by Business Pilot; if you would like to speak with their support team, call 0191 479 5911. Depending on your level of coverage, their opening hours will vary. If you would like more information, please refer to the contract you have with Sage Cover.
The order in which you import your data into Sage is crucial. There are some files that contain data that must be present before other data can be imported. The items should be imported in the order of export, starting with Customers, then Invoices, then Payments, and finally Costs.
We will take small steps to ensure that you are fully integrated from the start. Sage imports data easily and quickly. It will take a few minutes if you are unfamiliar with importing data to ensure you have followed the proper steps. The Sage tutorial video below will guide you through the new process in a comfortable manner. Using this integration, anyone with a ‘Purchasing’ or ‘Finance’ Role can add invoices and bills as soon as they are received, saving you a lot of time. In order to run through this integration into Sage, users must have the finance role, which can be added in the Admin area under users.
Taking the first step:
Sage Chart of Accounts: Locating and Exporting.
Onboarding covers this process, since we require nominal codes in your system build. You should check the nominal codes are correct, and make sure any new codes have been added to Sage since then.
Sage Chart of Accounts (Nominal Codes) can be obtained by following these steps:
- From Settings, then Business Settings, under the Financial Settings section, select Chart of Accounts.
- Click New Ledger Account arrow, then click Export Accounts.
- To start exporting the chart of accounts, click CSV.
An export notification appears in the Reports folder when it is ready.
The chart of accounts is divided into four columns;
- Code – This is the nominal code for this account.
- Name – This is the label for the nominal code
- Type – This is where the balance of the account will appear on your profit and loss report and balance sheet. Please note that if you’re unsure how you should treat a nominal code as you should contact your accountant.
- Area (not required in Business Pilot) – This is where the nominal code will show within your KashFlow account when inputting data.
The second step is:
Enter your codes into Business Pilot.
We will usually have imported your key nominal codes collected during the configuration process, but if you want to include more, you can.
- Go to Business Pilot.
- You will find your main menu on the right side of your logo (three horizontal lines).
- At the bottom of the list, click on ‘Admin’. If you do not have this tab, ask your manager to add ‘Admin’ to your roles and permissions; find out how here: https://businesspilot.co.uk/kb_articles/how-to-understand-user-roles-permissions.
- Click Nominal Codes under the Finance heading.
- You can add a nominal code by pressing the [+ Add Nominal Code] button.
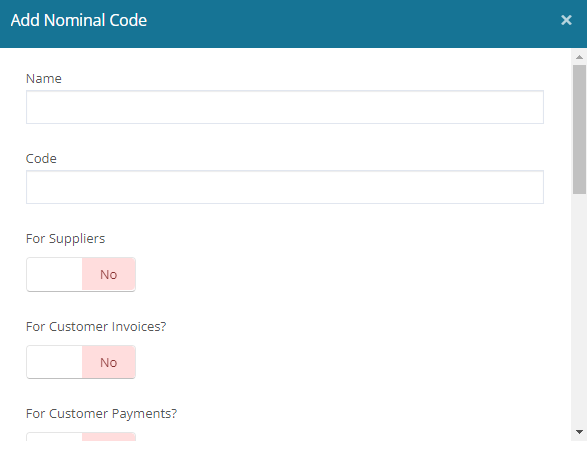
The third step is:
Setting up your Chart of Accounts or Nominal Codes in Business Pilot.
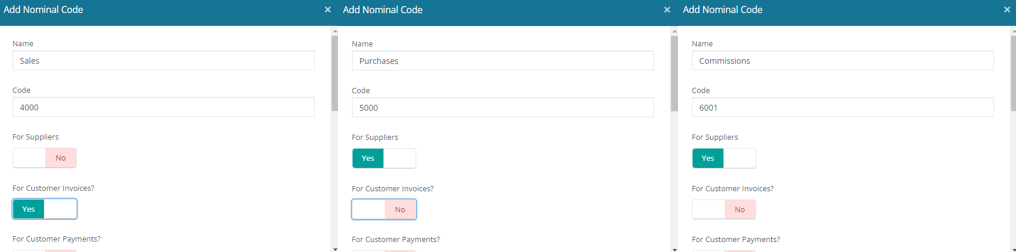
- In the ‘Name’ field, type the name of the nominal code, adding the code number in brackets is recommended. E.g. Sales (4000)
- In the ‘Code’ field, type the code.
- By clicking the toggle buttons, you can select whether this code is for suppliers or customers.
In order to add a cost, click on the relevant cost box, the cost code will usually be Material, Sales, Survey, Fitting, Remake, or Consumable. Codes relating to jobs are required, including Cost of Sales, Purchases, Labour, Materials, Commissions, Plant, Equipment Hire/Rental etc. It is not necessary to include codes for depreciation and overheads such as rent, utility costs, stationary etc
The fourth step is:
From Business Pilot, export the necessary files.
- Click Export and Export Items from the main menu. You should export the data chronologically, starting with Customers, then Invoices, then Payments. Any costings will benefit from this since you may have included a new supplier in your Customer import.
- Download a CSV file of the export before importing it into Sage by clicking on the Download (Sage) button.
Time to import:
A step-by-step guide to importing customers, invoices, payments, and costs.
We have already covered the specific format in our Sage exports, which are updated periodically to ensure that they are compatible with all Sage versions. Should Sage amend its import templates, you may download the structure and send it to support@businesspilot.co.uk so that we can arrange any necessary development. The standard fields covered in this development do not include customer-specific requirements. We have included a step-by-step guide below the video.
- Navigate to the file menu.
- Click on “Import”.
- It is important to close windows that are open.
- You are presented with a wizard for importing data.
- You should always make a backup before importing data.
- Click the next button to continue.
- Choose the type of data you want to process. We only use “Audit Trail transactions” for imports.
- Choose CSV from the menu.
- Navigate to Browse.
- Upload the file you want to upload. We only use for Customer Invoices and Costs uploads.
- We do not include import headings in our template. We use the headings in our uploads (First row contains headings – tick)
- You are presented with the option of mapping fields.
- Sage fields are listed in the far column, and imported fields are listed in the middle.
- You will need to match these column headings to the correct columns in our template (details are below).
- Click on the column heading or detail in our template to select it.
- The required fields must all be filled in (see * for details).
- Please click the next button.
- Click on Import.
- There will be a list of records imported and any that were not able to be imported will appear with a notice of errors, if this occurs, please contact Sage support. Or correct the data in the uploaded spreadsheet (eg. 0 value net amount, non-existent nominal A/C reference, wrong date format…)
Mapping Customers.

- Column A shows the account reference
- Column B is the account name.
- Column C is the address line (street) 1
- Column D is the address line (street) 2
- In Column E, you will find the address line (street) 3 (Surplus field)
- Column F is the town.
- Column G contains the county.
- In Column H, is the postcode.
- Column I is the telephone number.
- Column J contains the email 1.
- Column K contains the email 2.
- Column L is the Analysis 1 (contract number)
Mapping Customer Invoices.

- Column A is the type of data.
- Column B shows the account reference.
- Column C is the Nominal A/C Reference.
- Column D is the department code.
- In Column E, you will find the date.
- Column F is the reference.
- Column G contains the details.
- In Column H, you will find the Net Amount.
- Column I is the Tax Code.
- Column J contains the tax amount.
- Column K is the report type
- Column L is the project reference (contract number)
Mapping Customer Payments.

- Column A is the type of data.
- Column B shows the account reference.
- Column C is the Nominal A/C Reference.
- Column D is the department code.
- In Column E, you will find the date.
- Column F contains the details.
- Column G contains extra reference.
- In Column H, you will find the Net Amount.
- Column I is the Tax Code.
- Column J contains the tax amount.
- Column K is the invoice number/ reference
- Column L is the project reference (contract number)
Mapping Costs.

- Column A is the type of data.
- Column B shows the account reference.
- Column C is the Nominal A/C Reference.
- Column D is the department code.
- In Column E, you will find the date.
- Column F is the reference.
- Column G contains the details.
- In Column H, you will find the Net Amount.
- Column I is the Tax Code.
- Column J contains the tax amount.
- Column K is the project reference (contract number)
- Column L is the cost code reference (purchase order number)
Once the mapping and first import is complete, the subsequent imports will be a simple process.
Business Pilot has a continual development cycle and all new features are included within your subscription. In fact, as a user, we encourage you to ask for more! That way, we all benefit from a continually improved system.