We have made it easy to integrate Business Pilot with Xero. You can choose between a direct (automatic) integration using our Xero API, or use a more manual ‘export/import’ approach.
The Exports tab in our Main Menu lets you export Customer Invoices and Job Costs into Xero with our manual Xero Integration while also extending your reporting capabilities. With our direct integration with Xero too which takes care of this for you.
By integrating Business Pilot with Xero, invoices and purchase orders can be created in Business Pilot. Then, based on your choice of integration, these are either automatically sync’d with Xero, or you can manage the process by using the export/import method.
Payments are handled differently with both options, which is why we offer flexibility with each method to suit you and your business.
Remember, import mapping is a setting within Xero that is inaccessible to Business Pilot. This sadly means we are unable to assist you with this part.
To speak with the Xero support team, click "Contact Xero Support" at the bottom of their articles. Xero do provide various support options, including extensive articles, learning courses, and online support.
We will guide you through the process of importing your data into Xero step by step, making it easy and quick.
Xero, and Business Pilot recommends testing the import file in the demo company on the first batch, to make sure you are happy with where these records land before importing these into your company.
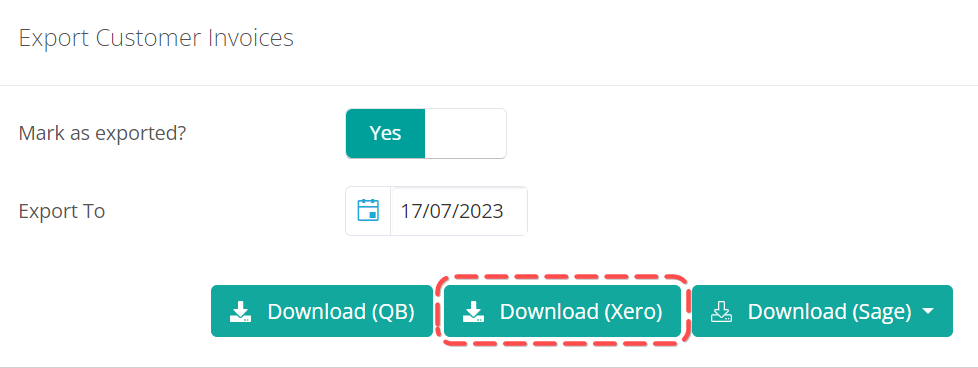
Customer Invoices
Please go to Business Pilot.
To access the Main Menu, click on the three horizontal lines located on the right side of your logo.
Under the Export tab, select Export Items. This action requires a user with a finance role or Super Admin to access.
Locate ‘Export Customer Invoices‘.
Please click on the option labelled ‘Download (Xero)‘ to proceed. The customer details are included in this template, so you don’t need to export them separately.
Save the file to either your desktop or a folder specifically created for storing such records.
Head over to Xero, and log in.
In the Business menu, select Invoices.
Click Import.
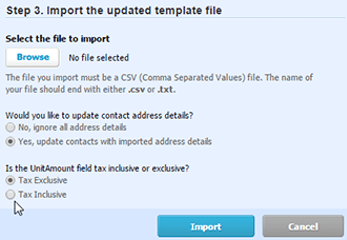
Click Browse and select your saved CSV file.
Choose whether you want to update your contacts’ address details or not.
Choose whether the prices in UnitAmount column are tax exclusive or tax inclusive. Our exports are Tax Exclusive, as you would specify the VAT Code at the Contract set-up stage.
Click Import.
Review the import message in Xero. If there are errors in the file, click Go Back, fix the errors, and then import the file again. Otherwise, click Complete Import.
Import Costs
Please go to Business Pilot.
To access the Main Menu, click on the three horizontal lines located on the right side of your logo.
Under the Export tab, select Export Items. This action requires a user with a finance role or Super Admin to access.
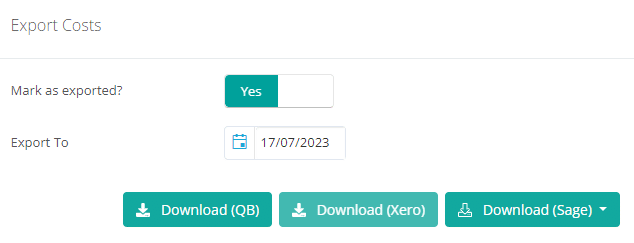
Locate ‘Export Costs’.
Please click on the option labelled ‘Download (Xero)’ to proceed.
Save the file to either your desktop or a folder specifically created for storing such records.
Please proceed to Xero and log in.
In the Business menu, select Bills to pay.
Click the arrow next to New bill, then select Import Bill or click Import.
Drag and drop the saved CSV file or click Select File.
(Optional) If you’ve entered contact emails and addresses that you want to change when you import this file, select Yes, update contacts with imported address details.
Choose whether the prices in the UnitAmount column are tax inclusive or exclusive. (same as the invoices above).
Click Confirm.
Review the import message in Xero. If there are errors in the file, you can go back to the file, fix them, then import the file again. Otherwise, click Complete import. You can always enter individual bills or credit notes, which aren’t successfully imported, afterwards.
DIRECT INTEGRATION
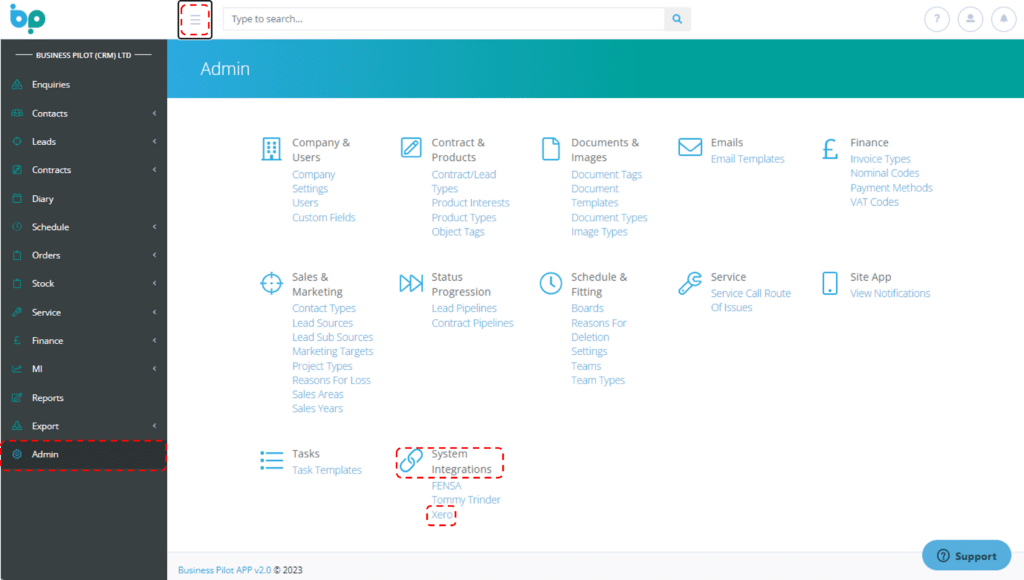
If you want to use our Xero direct API, navigate to the Admin Menu and click on System Integrations. You will also find Tommy Trinder and Fensa in this section.
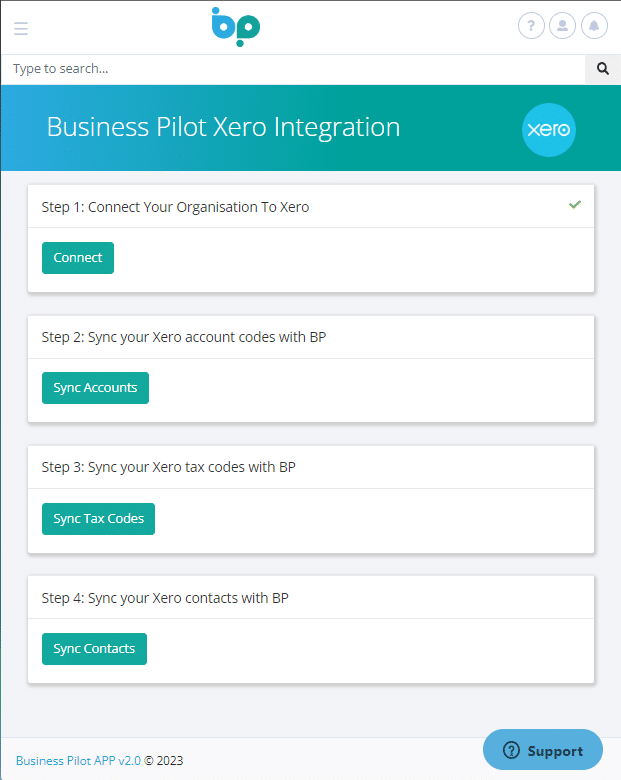
This will take you to the page inserted below…
Step 1:
Click Step 1: Connect Your Organisation to Xero.
Login to Xero.
The next step will confirm what permissions Business Pilot require to access your Xero data. If you’re happy, click ‘Allow access‘ at the bottom of the page.
You’ll be redirected back to Business Pilot, where it shows the following… (CIS not being enabled for Sub Contractors. This is picking up on a setting inside of Xero that allows you to post invoices with CIS deductions on and Xero track these through a specific CIS Labour Income account (210). See here for details about how to enable this in Xero).
Step 2:
Click on Step 2: Sync your Xero account codes with BP ‘Sync Accounts’ button.
This will attempt to match nominal codes in Business Pilot with Account Codes in Xero. Hopefully, you have these mostly in line already. The system will give you a summary of what it has done by saying from X accounts in Xero Y account were matched to the ones in Business Pilot. If there are unmatched codes, you can open a new tab, go to the BP Admin Menu, and select under Finance, Nominal Codes.
If you experience any difficultly with this step please view our Integration Guidance, before contacting us on our support channel
Step 3:
Now returning to your Xero setting you can start Step 3 to sync VAT/Tax codes between the two systems.
The system attempts to match the standard VAT codes between the systems and relies on the names of the Tax codes not having been altered in Xero from the default names. A message will be shown detailing what has been matched. You can check this by (in a new tab) going to the Admin Settings page and then under the Finance section click the VAT codes link. Here you can see all VAT codes in BP listed along with their rates and also then whether they are linked to ones in Xero. Note that the T21 and T26 codes weren’t linked initially. This is because the Xero system we used here didn’t have domestic reverse charging enabled. To enable them in Xero please visit here for details.
If you experience any difficultly with this step please view our Integration Guidance, before contacting us on our support channel
Step 4:
This will attempt to match existing contacts in BP with those in Xero. This is done by using the Account Reference field of the contact and matching to the same reference in Xero. If you haven’t been using Account References contacts would need to be linked manually otherwise when you next were to add an invoice or expense a new contact in Xero would be created. These can however be merged in Xero at a later date.
If you experience any difficultly with this step please view our Integration Guidance, before contacting us on our support channel
Step 5:
Finally, step 5 gives you a few controls on how the integration operates:
The first setting Default Branding Theme relates to how your invoices appear when viewed in Xero. This is not needed for BP and BP uses its own templates to create and send invoices to customers. In the vast majority of cases this would be set to standard. The second setting allows you to set a default number of days to say when an invoice is due post the raise date. Leave this as 0 days to have the invoice due on the raise date.
The last setting controls the state of invoices when they are added to Xero. The options are:
Draft – this allows you to inspect the invoice and then submit and approve the invoice (doesn’t affect the customer account or ledgers until submitted)
Submitted – the invoice still must be approved but the values in the invoice are live in relation to customer accounts and ledgers
Approved – the invoice is automatically approved and live straight away with no additional user input required in Xero.
Due to the way Xero works if the setting is set to either Draft or Submitted, credit notes cannot be applied to invoices that are not approved so please be aware that if you are operating in either of these modes that functionality would not be available. Once you are happy with your settings, please click update to save them.
To see how the direct integration changes your settings in Business Pilot please view our Integration Guide online here or you can download the PDF version.